So, you want to start your dropshipping journey with Shopify? Then, you have come to the right place. In this Shopify tutorial, I will teach you how to create your own Shopify Online Boutique so you can start dropshipping to make extra money for your family right away. How Much Money Does A Shopify Store Cost To Start?: Shopify Tutorial
There is very little money to start a dropshipping business as Shopify is only $29 a month after the 14 day free trial period.

If you can’t come up with $29 to continue your store after the trial, then get paid to do some surveys with Survey Junkie. Check out this article on how I have made $1.5k with Survey Junkie.
Why Should I Pick Shopify for My eCommerce Platform?
Shopify is so easy to use and very customizable. You will 100% own your own store, which won’t happen if you use Etsy or Ebay.
If you use WooCommerce, a WordPress plugin, for your store, then you risk having your site speed greatly reduced. WooCommerce could even make your site break so I don’t recommend it.
If you’d like to see a great review on more reasons to choose Shopify, then click here.
What Is Dropshipping?: Shopify Tutorial
If you don’t know, then check out this article on what dropshipping is.
In this “create your own Shopify store” tutorial, you will pay no money at all to get started and no credit card is required to create a Shopify store for the free 14 day free trial period.
You have nothing to lose if you don’t like having a store and don’t like making extra money. How does that sound? Are you ready?
Create Your Own Shopify Store For Dropshipping: Shopify Tutorial
Use this table of contents below to skip to certain sections in this tutorial.
- Signing Up For Your Shopify Store
- Choosing a Niche or General Store
- Picking a Name and Domain
- Installing Oberlo
- Finding a Winning Product With Niche Scraper
- Importing the Winning Product Using Oberlo
- Setting Up Your Shopify Store’s Theme
- Getting Traffic to Your New Shopify Store
- Fulfilling Orders With Oberlo
- Making Money With Shopify Dropshipping!
Sign Up For Your Shopify Store: Shopify Tutorial
First, let’s go over to Shopify and get a free 14 day free trial by signing up.
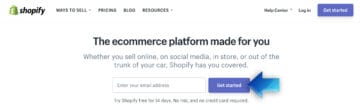
Fill out the box with your email address and then click the pretty purple button that says “Get Started” to get started! Easy, right?
Click here for a 14 day Free Shopify Trial!
Choose A Niche or General Store
I have thought of what I am going to sell in my store beforehand, which is cat supplies and accessories. This is called defining a niche, which is important when you are wanting to start a store. If you are new to selling online, then a general store is the way to go.
A general store is not niched down and can sell any item there is. If you want to test what items are performing well, then I recommend a general store. To learn more about whether to pick a niche or general store then check out this article.
Picking A Name and Domain For Your Shopify Store: Shopify Tutorial
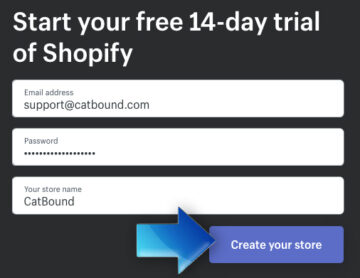
My store is going to be called Cat Bound, which will be the go-to destination for anything and everything CAT! Beforehand, I have purchased a domain and set up an email with BlueHost. Shopify lets you purchase a domain through them, which is easier if you have no web host or want to buy a domain from a 3rd party. I think this is the easier way for beginners without any technical know-how.
Shopify gives you a free domain with their name at the beginning such as “yourname.myshopify.com”. This is OK but I think it looks unprofessional. However, I have seen several stores keeping this as their domain so it should be alright to start if you have no money at all to spend on a domain. Remember, this was toted as a free tutorial at the beginning.
If you need helping finding a name and domain, then go to Name Vine. It is a free service that will show you different names that are available. Sometimes, the names they suggest are available but at a premium price. Just go back and find another name until you see one that looks good. I have discovered “catbound” by using Name Vine. Once you know your name, then click the “Create Your Store” button.

Installing Oberlo: Shopify Tutorial
After you have clicked the button to start up your store, this screen appears.
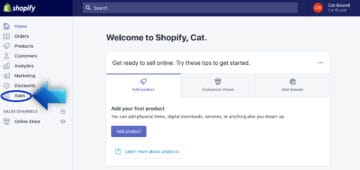
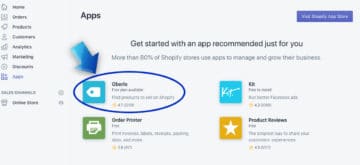
Head on over to “Apps” at the left before you do anything else, because you need to install the free app, Oberlo. With Oberlo, you can import items to your store in order to sell them quickly and easily. Oberlo also tells you what items are low on inventory and helps you fulfill orders fast with the customer’s shipping information. You need Oberlo so go install it right now!
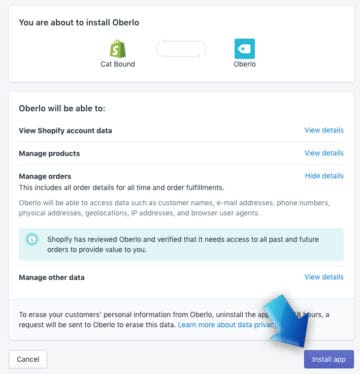
On the next screen, install the app and you will get a confirmation screen.
Once you install Oberlo, you get another screen where you can start a tour. I highly recommend you go through the tour to understand how Oberlo works. When the tour is over, then you see this dashboard where you can search for an item.
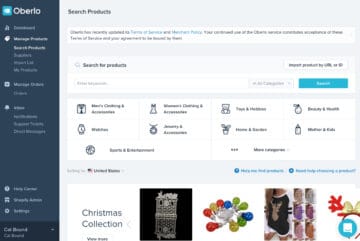
What item should you sell? This is a very important question, which brings us to the next section on finding a winning product.
Click here for a 14 day Free Shopify Trial!
Finding A Winning Product With Niche Scraper
Finding what to sell is paramount because if you decided to go with a niche store and can’t find a winning product for that niche, then you might want to go with another niche or choose a general store. Again, here is the article that helps you decide on a niche or general store.
Niche Scraper is a paid tool, but if you are new then you can get a free trial to try it out.
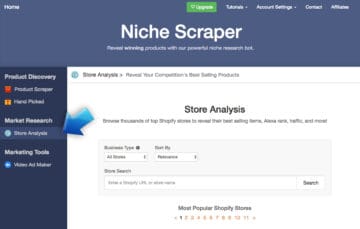
Once you have made a Niche Scraper account, then head over to “Store Analysis” to see what popular stores in your niche are selling. You can view their top selling product here and import it into your store with Oberlo, if it is a dropshipping item.
Select “Verified Dropshipping” under “Business Type” to see only stores that sell dropshipping items. Then, sort by “Store Popularity” under “Sort By”. Scroll down until you see an item that you’d like to sell that pertains to your niche.
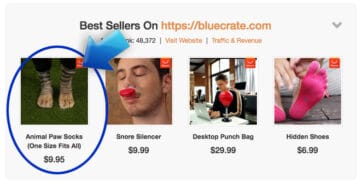
For me, this happened with the 2nd store, Blue Crate, a super popular Shopify that is even listed on the New York Stock Exchange! Isn’t that amazing to know that a dropshipping store can be publicly traded? The sky is the limit with dropshipping and Shopify.
The item I am going to import into my Shopify store using Oberlo is “Animal Paw Socks”. They look like kitty cat feet, which is perfect for my niche – CATS! These socks are the top selling item at Blue Crate so surely, they will be a hit in my brand new store. I am getting so excited that I’m getting goose bumps. I can’t believe how easy it is to make money online! Can you?
Importing The Winning Product Using Oberlo: Shopify Tutorial
Search for your product on Oberlo and only select the product if it is green and says “Verified”. Oberlo is a great app because it verifies sellers that actually will ship the item in a reasonable amount of time and has good reviews.
I found the item for sale relatively fast by searching for “Animal Paw Socks” in the search bar. The socks are only selling for $3.55, yet Blue Crate is charging way more at almost $10.
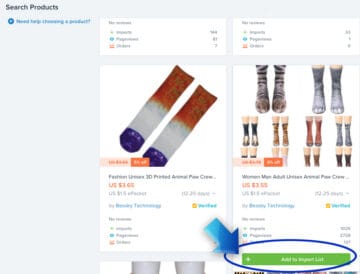
Clicking the green button will add it to your import list. I suggest looking for other items now to import to your store that match your niche.
This one item is the winning product, which will bring customers to your store. Therefore, the other items you import as not as important. You can feel free and find more winning products with Niche Scraper if you’d like.
You can then edit the description and title of the item however you’d like. I recommend putting a descriptive title and paragraph about the item to sell it to the customer.
If you have lots of products, then consider putting them into different collections. Go to “Collections” at the left side to get started.
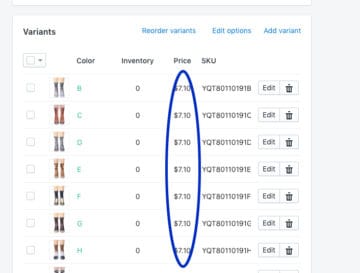
Also, edit the price of the item too. Oberlo imports the item as the price it costs on the dropshipping supplier’s website. Delete variants of the item that aren’t related to your niche. In my case, I’m deleting the animal socks that are not cats so I’m left with tabby and tiger socks.
When you are ready to start actually creating your store’s theme, then come back to me. 🙂 I’ll be here with dollar signs in my eyes.
Setting Up Your Shopify Store’s Theme: Shopify Tutorial
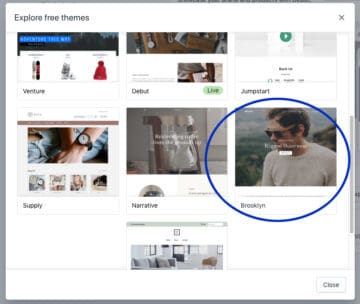
Once you have stocked up your store with items using Oberlo, then it is time to work on your site’s theme. Shopify has several free themes to choose as well as paid themes.

Go to Sales Channels, Online Store and then Free Themes.
Create Your Own Shopify Store: Best Free Theme
Brooklyn is the best free theme, I think, because it is high converting. My theme in my other store is using Brooklyn and I haven’t had any problems with it. You can choose paid theme if you want, but this tutorial is free so we are going with a free theme. I’m using the second version of Brooklyn that looks cute, not the default.
Once you select the theme, then install it and select customize.

You will then get to a screen with your Shopify store’s theme that you can easily customize with no coding knowledge.
Create Your Own Shopify Store: Edit the Header
At the left, select header. Here is where you can upload a logo for your store or just keep the text if you don’t want a logo.
If you do want a logo, you can either design it yourself free using an image program like Canva or hire someone on Upwork or Fiverr.com to make it for you.
For this tutorial, I am going to keep the text and not upload a logo right now. I may design a logo in the future for this store, however.
Click here for a 14 day Free Shopify Trial!
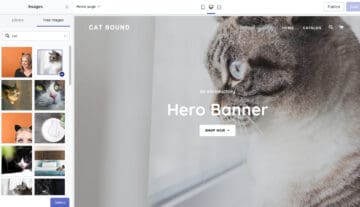
Edit the Hero Banner Slideshow
We are going to now edit the hero banner slideshow, the big image of the store that customers will see first. If you want, you can use Canva to make your own hero banner and display some items you are selling. However, I’m going to just put a free image for now as my hero banner for this tutorial.
Some free stock photo sites are Unsplash and Pexels. I’m going to search Unsplash for a nice free cat photo. You can even use Shopify‘s library of free images. I found a cute one for my banner!
When you have some nice photos, go to “Slideshow”, then “Content”. Select your images and then click “Select” at the bottom of the screen.
You can add more images for the slideshow if you’d like. For now, I’m not going to add any more images.
You can then edit the text of the hero slider after selecting the image. Also, the link of the call to action button, which I pointed to my products.

Create Your Own Shopify Store: Edit the Next Sections of the Theme
The next item to customize is the Custom HTML. If you don’t know how to code, then that is ok. Just edit the text within the tags like I have below:
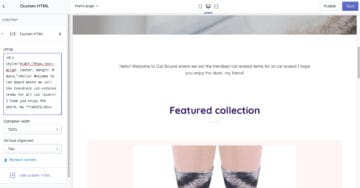
Next, we have the Featured Collection, which can be left as is unless you want to change something.

Edit the Newsletter: Shopify Tutorial
The newsletter, on the other hand, needs to be changed so I have edited the text. If you don’t want to worry about having a newsletter, then delete this section.
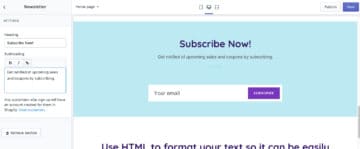
The HTML section is going to be removed unless you’d like to edit it with some more text.
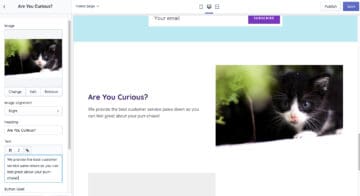
Edit the Image With Text sections
For the next two “Image with Text” sections, I’m going to add in a free image from Shopify‘s library and edit the text. It is so easy!
Create Your Own Shopify Store: Edit the Footer
Create a Contact Page
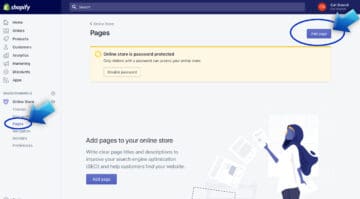
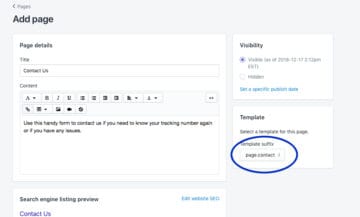
For the footer (and header), we need to put in a Contact page. Let’s do that now! Go back to the homepage by clicking the Shopify icon at the top left corner. Then go to Pages and Add Page.
Then select “page.contact” under the Template suffix for the Contact Page template.
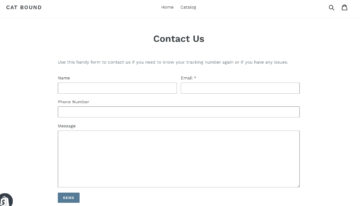
When you click save and then view page then you should see your new contact page. Whatever email you signed up with, the contact form will send to that email.
Create Legal Pages
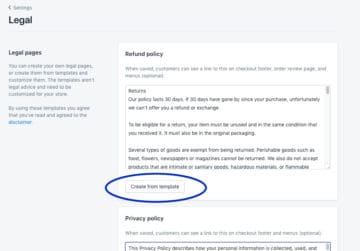
Now, we should create legal pages for the footer. Shopify lets you do this quickly and easily. Go to Settings the bottom left and then Legal.

Now, click “Create from Template” for the Refund Policy, Privacy Policy and Terms of Service.
For the Shipping policy, state that the items are dropshipped from other countries so can take from 5-10 days standard. You can get creative with the wording if you’d like. For Cat Bound, I put:
“Cat Bound partners with global merchants and artisans in order to provide you the best prices and the most awesome products. This means that your order is shipped from global areas such as Thailand, Tibet, China, India, etc. via our partnership with USPS. Because we ship directly from our partners in these countries, your item may take 3-5 weeks to arrive. Please do not panic if it does not show up immediately, it’s on its way (please contact us for tracking) 🙂 We offer international shipping options too – no matter where you are, you can buy from us!”
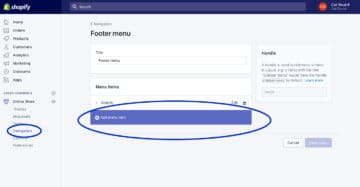
Now that we have these legal pages, let’s add them to the footer. Go back to the Home and then Navigation, then Footer menu, then add item.
Click in the “Link” box and then scroll down to “Policies”.
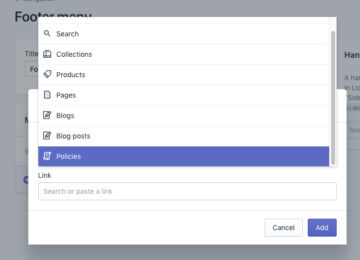
It will then list all of the legal pages we have generated from Shopify!
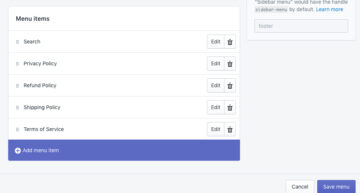
Add each legal page and contact page to the footer until you have a list of the 5 pages. Then click “Save menu”.
Create Your Own Shopify Store: Add The Contact Page To Main Menu
In a similar fashion to the footer menus, add the contact page to the main menu of your store. You can arrange it in any position you’d like.

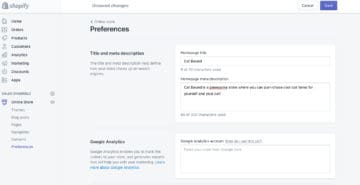
Configure Store Preferences
Head on over to Preferences, the last item on the list under Sales Channel/Online Store. Put in your store’s title and description for SEO purposes.
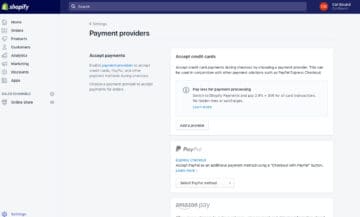
Create Your Own Shopify Store: Add Payment Method and Paypal
Go to Settings and then Payment providers to add the method that you want to get paid. If you have a Paypal, then enter that information under Paypal.
Create Your Own Shopify Store: Configure Shipping Options
Free shipping is a popular method to add to your store. The items that you buy from dropshipping sites will usually have free shipping and cost so little, so why not? Check out this guide on how to configure the shipping options for your store.
Create Your Own Shopify Store: Publish Your Store
When you are ready, click “Publish” at the top right of your store’s theme customization screen. Your store will now be password protected until you are ready to launch it. After you publish, “live” will display instead of “publish”.
Click here for a 14 day Free Shopify Trial!
Disable the Password
When you are ready to go, then disable the password that is protecting your store. Make sure you don’t have any misspelled words and everything looks good before doing this. Now, bring on the customers!
Create Your Own Shopify Store: More Help On Setting Up the Brooklyn Theme
Shopify has made an entire section on its website to support the Brooklyn theme, making it one of the best free themes to use. To see the guide then click here.
Getting Traffic To Your New Shopify Store
There are several ways to get traffic and customers to your store right away such as placing Facebook, Instagram and Pinterest ads. This costs money, however. Remember the winning product we found with Niche Scraper? Feature this product in all ads to your store.
If you want free traffic then your best bet would be starting a business blog for 60% more customers, implementing strong SEO practices, starting social media accounts and adding them to your store and other options. Check out this article on getting traffic to your Shopify store for more details.
Kara over at Simplifying DIY Design has made several free and paid Canva templates to promote your site or store that you can download. This is great if you want to promote your product and store on Pinterest, Facebook or other social media.
Shopify is a great way to make money on the side for your family and super easy as you have seen.
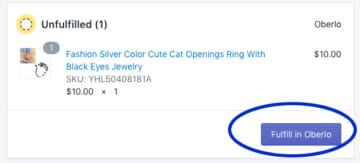
Fulfill Orders With Oberlo
If you have installed the Shopify app, then you will get a “cha-ching” sound when someone places an order. Take a look at your orders and it will tell you which ones to fulfill using Oberlo.
In Oberlo, follow the prompts to input your business credit card information to pay for the item. That item will then be shipped to your customer! If you get overloaded with orders, then you might want to hire a Virtual Assistant (VA) off of Upwork.
Make Money With Dropshipping: Shopify Tutorial
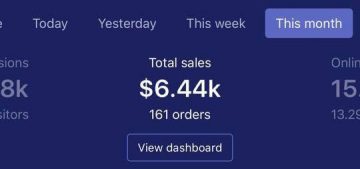
I personally make several thousand dollars of extra money a month by dropshipping with my own Shopify store and so can you. Creating a Shopify store is easy, but starting your own blog is easier so head over here to find out more.
I’m going to continue working on Cat Bound, our demo store in this tutorial, to turn it into a money-making store so make sure you are subscribed so you won’t miss anything. It is so easy to create your own Shopify store and I hoped this article helped you.
If you have any questions, then sound off in the comments or feel free to contact me!
Related Posts:
- 9 Easy Steps: Create Your Own Shopify Store For Dropshipping In 2019
- Shopify Traffic: Top 10 Best Strategies To Drive Traffic to Your Store
- Shopify Niche: How To Choose The Best Niche For You?
Pin to Pinterest: